Ok, this is the completed look. Picture is by Magical Harkow from her post here. Since the Harry Potter and the Deathly Hallows part 2 is coming up, this tutorial is how to make a robe and a wand.
Some people have asked how to make the robes or a Harry Potter costume since we’d have the Harry Potter finale party at the multipurpose room of the National Library on 9 July, 6.30pm- 8.30pm.
So here it is.
Let’s start with the wand first since it’s easiest and the robe tutorial will be below it.
Wand Tutorial
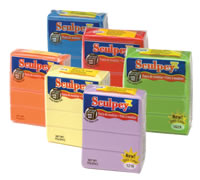
Yep. That is all there is to it! It’s actually a large paint brush! You can buy it at Spotlight, Art Friend or pretty much any art store. The handle is made out of Sculpey.
You can find various colours of Sculpey at Art Friend or Spotlight. It costs around $5 SGD a pack and you usually just need one for one wand. It is an oven baked clay. Thus, you mold the handle to how you like it on the bristle side of the brush!
Make sure you read the instructions of the Sculpey properly and bake it in the OVEN for the correct amount of time and temperature. The wood will not burn. After that, you can paint your brush to whatever the handle’s colour is and let it dry.
Alternative Method
- Find a small piece of twig long enough to use at a wand! Can be found at a park etc.
- Buy a wooden dowel and cut it with a hand saw and then smooth it with a rasp and sandpaper. (Lots of time and work.)
- Just hide the bristle end of the brush in your hand!
- Instead of Sculpey, you can try Jumping Clay which air dries but the texture will be MUCH different.
Yep. Brushes aren’t that difficult depending on what sort you want them to be.
Hogwarts Robe Tutorial
Ok, if you do NOT put in the lining and increase the size of the hood, you can make Death Eater robes instead. House colours range from red, yellow, green and blue. Don’t forget to look at real pictures of robes as reference.
This is my “faking it” tutorial because this is just a photo worthy robe and not a Hero Robe where it’s proper. My lining is fake that it doesn’t go for the whole robe and instead just where a person might just see or just good for photos. For real robes, go look at another tutorial since this is just for beginners and for those who don’t want to spend on too much cloth.
This isn’t an “exact measurement” tutorial since you still have to pin up and check your lengths for yourself but this is how I did mine.
Things you need
- Black cloth
- House colour cloth (red/yellow/green/blue)
- Sewing machine + black thread
- Hooks for the robes
- House badge
To calculate how much cloth you need, you’ll have to read this tutorial before doing so, so you’ll know what I mean by the measurement. I’ll state how each individual piece is made below the attaching it all together instructions.
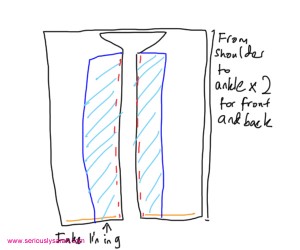
This is how it goes all together. There are four piece in total. 2 sleeves, 1 hood and the actual robe. The robe is the length of your shoulder to your ankle times 2 plus a few extra inches. So pretty much, the whole robe is ONE piece of long cloth.
The length of the sleeves is your arm length plus extra to make that billowing look and to attach it to the robe.
The hood is how much you want it to be, usually I just estimate.
See where the red lines are? That’s where you attach the sleeves to the robe or the hood to the robe. The pink lines is where the back and front of the robes are sewn together when you fold your robe in HALF.
Attach sleeves first and then sew from BOTTOM of the tip of your sleeves downwards the robe. Do this for both sides! Make sure you PIN all of this together to check you’re sewing on the correct side of the robes and when done, you flip it over inside out and it will be ready to wear.
For the hood, you might find extra bits near the front of the robe but you can just either sew it away or fold it as long as it looks right. Then, tada! A robe!
Front Robe
Ok, this is the actual body of the robe. The cloth is folded into two. The width of the robe should at least cover your shoulders, the 60 inch one works well. So what you need is your fake lining. Just get your House Colour, sew it to where you cut the front of your robe in half. It should be understandable from this diagram. Once your lining is attached to the robe, hem the bottom. The front and the back of the robe. You can hem the inside edges of the inner fake lining too where no one sees it if your material frays.
Cut a neck hole and wear the robe in this state so you can see if the length is correct for you. If it’s too long, just hem the bottom more! It’s only a problem if you didn’t measure right and that it gets TOO short. Also, at this stage, you might notice that the shoulder part is long. Hence, you don’t really need to do your sleeve pieces too long if it reaches past your upper arm or something.
Sleeves
One sleeve was pretty much a rectangle that I sewed my House Colour and then flipped it so the sewn bit was on the opposite side and thus it looked like the lining was attached to the sleeve. Look at other robes and even my picture at the top to see what I mean.
Hood
Ok, you can’t fake too much with the hood because you can see the lining when it’s not being used. Thus, you have to sew the lining to the rectangle of black cloth and flip it inside out like a bag. Fold half of the material and sew the back edges together. However, you might find a line of material if you sew too much for the back. Either you cut it neatly away and no one can really see it OR, you can just skip that bit and instead sew the rectangle straight to the robe.
If you do the latter, you’ll find you have “extra” length near the front where the sides of the hood are attached to the robe. You can either just sew it downwards or cut it off after you have properly sewn it down. Mind you, if you do the latter, make sure your rectangle is big enough so it has enough slack if you want to put the hood up. There are many tutorials for hoods out there if you search online too.
Other things
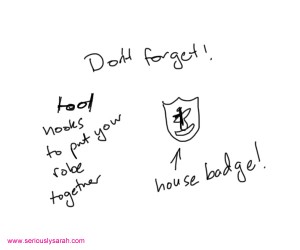
Once you’ve attached all the piece together, don’t forget about your house badge or the hooks in the front to keep your robe together! For the house badge, you can either print and laminate it and paste it on your robe, print on iron transfer paper and then iron it on a white cloth and sew it on or buy online from Ebay and other online shops. You can always find house badges online if you search for it anyway.
That is it! Use this guide as an estimate on how you’d make your robe. Of course, make some sort of pattern or model on pieces of paper before sewing to make sure you won’t make any mistakes!


Fantastic tutorial!
Love the tutorial! Sadly, I don’t know if it’s my Internet connection or not, but I don’t see any pictures or diagrams with the robe tutorial, though you’ve referenced some. It’s an awesome tutorial and I would love to try it, but I think it would be much easier to follow with diagrams.
It’s there! Try refreshing or something because there certainly are pictures and you need to check to see it!
Maybe if you can’t, try hovering your mouse to see if you find an invisible hotlink above the JUST below the sub-heads and open it on a new window. I did labels for the graphics too for browsers that don’t read graphics.
Sooo if you don’t see the words like “How it goes all together”, “The hood.”, “A sleeve.” and “Don’t forget!” then eek, please use another browser or computer.
Very useful tutorial, thanks! May I know if there’s anywhere in SG that sells the house ties?
Hello, none that I know of. Popcorn COULD have but depends on the stock. Usually we just buy ties from Far East Plaza, the cheap $2 or $5 ones if you want fancy material, a silver/gold painty marker or a black one if you’re doing Hufflepuff and draw on them with a ruler.
For making the wand, where can I find a twig? I don’t have a park near by.
I don’t know where you live! Ask friends where you can find one? I use a paintbrush.